When I have bought patterns, I like to be able to use them more than once... And I like to be able to do the same thing with my own designs. So with my urban bag pattern I would like to show you some of the pattern hacks I have done.
The original urban bag pattern is a cute little purse that I use all the time as my everyday purse. I have made multiple versions of this pattern. The finished size is 6 1/2" x 3 1/2" without the strap. I have also just added this pattern to my website as a
PDF download... so you can print at home... Yay!
 |
| My current urban bag I am using, made out of beautiful Amy Butler Fabric. |
But my mum asked me to make her a little change purse... I have made her change purses for a very long time! he he... So I took my Urban Bag main fabric template and went to the photocopier and recopied the template to
85% of the original size. (decreasing the size of the bag) I then used my quilting ruler and marked a half inch line inside the main fabric template to make the template for the Peltex 71F interfacing. I then made followed the steps of the pattern, omitting the strap. This includes Step 12, for the corners, they will remain at 3/4" from each corner. Finish pattern as described.
The end result? A cute little purse 5 1/2" x 2 3/4" and 1 3/4" wide.
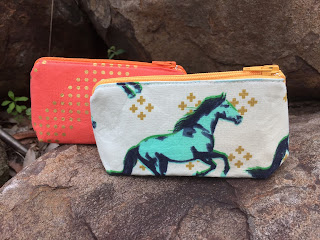 |
| Little change purses.... mmm... love the Cotton & Steel Fabric. |
My second pattern hack was a request from my 15 year old daughter, she asked if I could make her a pencil case for school! Okay I was a bit excited for her to ask me to make her something for school, you know what teenagers are like! So this time, I took my Urban Bag main fabric template and went to the photocopier and recopied the template to
160% of the original size. (increasing the size of the bag) I then used my quilting ruler and marked a half inch line inside the main fabric template to make the template for the Peltex 71F interfacing.
I made a couple of small additions for the bigger size. The main one was that I made zipper tabs on each end of the zipper. This makes the zipper sit really nice, especially for the bigger size, this is important.
So at Step One when cutting out the fabric, also cut out 2 x 2 inch square pieces of your main fabric, these are your zipper tabs. Take one of these pieces and with wrong sides together, fold in half and iron. Open out and fold the raw edges towards the center crease. Repeat with the other zipper tab. For this pattern hack, you will need at least a 12 inch (25cm) zipper, I used a chunky zip.
Take your zipper and trim the end, where the zipper pull ends close to the metal zipper stops. Then measure from those stops, 10" and mark. Trim this end. You will now have a ten inch zip.
Place one end of the zipper inside one of the pressed zipper tabs and pin. The zipper tabs will be wider than than the zipper but it will be trimmed. Using your sewing machine, top stitch the zipper tab closed. Repeat for the other end. Trim edges of the zipper tabs even with the zip.
Zipper with zipper tabs done! Going back to the Urban Bag pattern, Step Three, When placing the zipper you will centre the zipper along the top edge as described. You should have at least 1/2" on either side of the zipper.
Continue on with pattern until Step 12, making the corners,
I used 2" for my measurement from the corner instead of 3/4". Finish pattern as described.
This makes a great size pencil case... Finished size, 10 1/2" x 5 1/2" and 4" wide, and yes my daughter loves it!
Have fun with these pattern hacks. I would love to see what your making.
Happy Creating!